**2019 Update** The Simplicity 2506 pattern I used for this costume is no longer  available. I haven’t tried it, but Simplicity 1765 looks like a good replacement option. Please let me know if you try it out!
**2017 Update** Every year I get a few requests to sell this costume or make new ones, and I regret that I am unable to do so. I wish you all the best of luck in finding another costume or making one for yourself!
Halloween is a busy time here at VisibleBlue. I get more traffic during October than any other month, no doubt thanks to the Cookie Monster costume series. But hey, that’s not really a surprise, considering I’m a terrible slacker during the rest of the year and I’ve updated….oh….only 4 or 5 times since then. Pathetic! Now I’m just going to go ahead and drum up some more Halloween traffic with this latest series – homemade Bowser costume!
 This year, after some particularly inspired costume ideas (“tree,” “floor,” “mystery”) my son landed on Bowser – you know, the villain from the Super Mario Brothers franchise. Why pick a villain? Straight from his mouth: “I like monsters, and Bowser has spikes and I don’t have spikes.” Let’s remedy that, shall we?
I thought this would be a fairly simple purchase. I see tons of Marios and Luigis every Halloween, so surely one of the most recognizable video game villains of all time would have his own costume! As it turns out, he does not. The only one I could find was a full-size adult mascot-style costume. Hey, at least I have some practice at this costume-making thing!
I decided to break the costume down into parts, and I’ll do the same with these posts. The first post will focus on Bowser’s body, the second part of the series will be his shell, and in the third, we’ll construct his head. I’ll try to get the other two posts out before the week is over, but I’m actually still working on the head as we speak.
So let’s take a look at the main body parts. Hey, look! He’s basically just a dinosaur. Now where have I seen this costume before…Oh yeah! My new favorite purchase, the Simplicity 2506 pattern! Last year I modified the devil pattern to make Cookie Monster, and this year I tweaked the dinosaur pattern a bit and came up with a pretty passable Bowser! I used gold and cream fleece for his skin, and felt for everything else. I followed the pattern mostly as directed (minus the head), with a few exceptions.
The Materials
For the whole project – not all of these will be used in part one. This list assumes you’re making the costume for a small child – for a larger kid or adult, you’ll need to increase the yardage accordingly!
- Gold fleece, as per the pattern
- Cream fleece, as per the pattern (contrast)
- Green fleece (about half a yard)
- Black felt (one sheet)
- Red felt (two sheets)
- White felt (one sheet)
- Cream felt (about half a yard) ( I used white, but wish I had bought cream instead.)
- Batting (1/2 yard)
- Polyfill (10 oz.)
- Thread (green, black, cream, red, gold)
- Notions as per the pattern
- Studs or spikes (I salvaged mine from an old belt-turned-bag, but I have seen them at Jo-Ann Fabric)
- Black ribbon, nylon webbing, or another material suitable for straps
The Feet
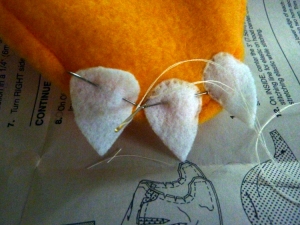
Like last year, I omitted the bottom of the booties so he can wear them like spats over his shoes. A strip of elastic holds them to his feet. I cut six teardrops out of white felt and sewed them to the front of the booties for toenails.
The Stomach
I added a few extra lines of quilting to the stomach, though in hindsight, I only needed to add one. I got a bit overzealous, I guess!
The Tail
Unfortunately, I didn’t take any photos of this process, but it wasn’t too difficult. Where the pattern directs you to cut the tail spike pieces, I chose to use white felt, and I only cut two pieces. I sewed and turned them like directed, but stuffed them firmly before sewing them into the tail. I prefer the 3-D spikes over the flat ones.
The Jewelry

4 upper arm pieces (to be joined into 2 strips), 2 wrist pieces, 2 neck pieces (to be joined into 1)
Bear with me a bit, because here’s where the science goes out the window and the art comes into play. To make Bowser’s bracelets, necklace, and arm bands (which actually are not used in this section, but will come back in the shell tutorial), I cut strips of black felt approximately one inch wide. If you prefer, you could use something a bit stronger than felt for the upper arm straps, as they will be supporting the shell. If I had to do it over again, I might use ribbon or nylon webbing.) For the bracelets, I measured the distance around the wrist and was able to cut the felt an inch or so longer than that measurement. For the upper arm straps and neck, I had to sew two strips together to get the appropriate length. Here’s a photo of the strips after cutting – wrist pieces are labeled in chalk with “W”, upper arm pieces with “U”, and neck with “N”. I just guessed on the length of the upper arm pieces – you want to end up with something around the same length as backpack straps. For the spikes, I salvaged an old bag from another lifetime. They may not be as pokey as Bowser’s, but you get the idea. Plus, my son has to wear this to preschool.
After putting all the studs into the felt (they have little prongs on the back), I hand sewed the bracelets onto the costume wristbands, and the necklace onto the neckband, leaving about half an inch of overlap. I added a piece of hook and loop tape to each side of the necklace.


What did you use cream felt for?
I didn’t actually use it, but Bowser’s horns and spikes should be cream. I accidentally bought white, so went ahead and used white.
[…] lucky to find some awesome tutorials for Mario and Luigi hats and even a Hammer Brothers outfit (adapted from this Bowser costume). Isaac was super insistent on his choice of […]
I have a question…if I don’t want to add the bottom or sole of the shoe cause I feel it will just get all soggy (we live in PA rains a lot) what alternative can I do? I figured maybe some elastic to hold it in place but I don’t want it to frey.
I didn’t add the sole either – just finished the bottom edge and stitched a piece of elastic across. I did this for both the Bowser costume and the Cookie Monster costume from the previous year, and it was cold and rainy both nights (not too far from you in Ohio). The fabric and elastic got really dirty and wet, but the shoe covers held up just fine!
[…] Tutorial inspiration: https://visibleblue.wordpress.com/2013/10/17/can-a-3-year-old-be-king-of-the-koopas/ […]
The pattern you linked is no longer available. Do you have images or instructions to sew the tail??
https://www.simplicity.com/simplicity-storefront-catalog/patterns/costumes/simplicity-pattern-1765-childs-and-dog-costumes/ looks like it may be a decent replacement. The tail looks very similar.
We live in Texas where in October it is still quite warm. I’m afraid fleece (which the patter calls for) will be too hot. Any suggestions or recommendations on what other fabric to use for the yellow body suit?
It won’t be as structurally supportive for the tail, but I think a cotton jersey would work just fine and wouldn’t be too hot!