VisibleBlue

Bowser Costume, Part 3 – The Head October 25, 2013

Filed under: DIY,Kids — VisibleBlue @ 12:13 am
Tags: , , , , , , , , ,

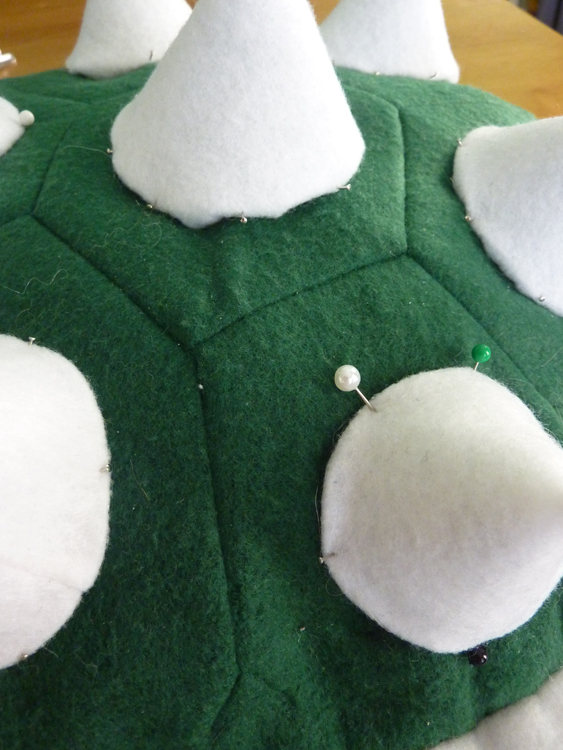
Alright, we’re in the home stretch now! If you missed part one (the body) or part two (the shell) of the Bowser costume series, head that way and we’ll meet back here! If not, welcome to the most nebulous, frustrating, and free-form part of the costume – Bowser’s head! If I were to do the whole costume over again, I definitely would have started with this part, when I had some momentum! Now, a week away from Halloween, I just want to get the damn thing done. And sadly, it shows. Oh well, here we go!

Remember our Simplicity 2506 pattern? We’re going to use that again for the head. Use the pattern for the dragon head – but don’t include the spikes. It’s basically just a regular hood.  Make sure you use the green fleece for his head – it’s not gold like the rest of his body. (Yep, I ended up making two hoods for that reason.) Also, cut out and sew the horns (using the cream felt) from the devil costume. Stuff, pin, and sew them onto the hood. You should set them slightly wider apart than I did.

Draw the hair shape, but be sure to leave room for the seam allowance!

Draw the hair shape, but be sure to leave room for the seam allowance!

For Bowser’s hair, draw a shape on the red felt that roughly follows the curve of the hood, with spikes on top. Make sure to account for seam allowance on the spikes when you draw them. Stack two layers of the felt and cut out your shape. Clip and fold up the bottom 1/4″ for a nicer finish (see fig. 1). Sew along the the top of the hair, turn, and press.  Stuff the hair with polyfill and pin to your hood. Faster option – instead of the spikes included in the pattern, cut out the shape of Bowser’s hair and sew it in the center of the hood, just like the pattern does with the spikes. All that hand sewing takes quite a lot of time.

Fig. 1 - Sew along the unfolded edges.

Fig. 1 – Sew along the unfolded edges.

Yes, astute reader, the hood should have been green! That is why it looks like an evil rooster.

Yes, astute reader, the hood should have been green! That is why it looks like an evil rooster.

While you have the red felt out, cut out two eyebrow shapes, like this:

eyebrows

Also cut out the parts of the eyes (two of each, obviously.) You’ll need red circles for the irises, smaller black circles for the pupils, and tiny white circles for the “shine”. Cut four sort-of-ovular shapes out of the white felt for the eyeballs. Sew two of them together, leaving space to stuff, and trim the edges. Firmly stuff the eyes and close the gap. I glued the parts of the eyes together, and ran a needle and thread through the iris where the “shine” would be just to ensure that they would stay put. Sew the eyes into place, and glue the eyebrows on top of them. Faster option – 2-D  eyes would be perfectly lovely, too!

The scale will be totally dependent on the size of your hood, but in my version, the irises are a little larger than a nickel.

The scale will be totally dependent on the size of your hood, but in my version, the irises are a little larger than a nickel. Just eyeball it. Ha! Get it?

The longer I look at this, the creepier it gets.

The longer I look at this, the creepier it gets.

Now, the mouth. Ahhh, the mouth, my biggest challenge, and biggest disappointment. I’m sure I’ll spend the next week tweaking it to try and get it to look right, but for now, here’s what I have. I really had no idea where to start. My initial idea of molding felt around ping pong balls didn’t really pan out, so I had a glass of wine or two, didn’t come up with any brilliant ideas, and decided just to make a tube out of the cream felt.  I wanted to at least have some definition in the nose, so I sort of folded the edges in and sewed them in place. This created kind of a “point” at the bottom, which I folded back and sewed down. I wish I could explain that better, but I’m really not sure how.

This is the point at which I knew this would not end well.

Underside of the mouth. It looks strikingly like a sock. This is the point at which I knew this would not end well.

Closer version of the mouth - the blue is where nostrils would go.

Closer version of the mouth – the blue is where nostrils would go.

teethI stuffed the center firmly and the ends more loosely. I cut out three sets of triangles for teeth from the white felt, and sewed them onto the bottom of the mouth, pressing them down at the seam. Then I closed up the edges and sewed the whole thing to the hood.

So here are the problems I’m left with: The mouth is too low and makes it difficult for my son to see out. I’m going to add some elastic to the back of the hood in hopes that it will pull the front up a bit. Also, the mouth is too wide. I want it to fold down in the middle and up at the edges a bit. Tying the ribbons under his chin helps a bit, but it’s not what I had envisioned. Anyone have any ideas? I have a week left – I’d love to hear them!

Doing his best Bowser impression.

Doing his best Bowser impression.


Bowser Costume, Part 2 – The Shell October 17, 2013

DIY Bowser Shell for Costume

Did you miss part one of the Bowser costume series?

In part two, we’ll cover just the shell. This is a really flexible project and could easily be adapted as a pillow or turtle shell if that’s what you’re looking for. For a pillow, I’d advise against using the felt and instead stick with fleece or something more durable. I know I’d be making a million of these little Bowser shell pillows if there wasn’t so much hand sewing involved! The materials required for this project are discussed in part one.

A note before we begin – I was making this up as I went along, and did some things that perhaps weren’t necessary. Do as I say, not as I do!

First, you’ll need a large piece of cardboard. This will help with the structural integrity, as well as limit the amount of stuffing you need. If you’re making a pillow, you can skip this step! Determine the size of the shell (for a costume) by measuring the distance between the neck of the jumpsuit and the top of the tail. Sketch an oval roughly that size on the cardboard. You don’t need to be a perfectionist about it – this will all be hidden under quite a lot of material and stuffing. Cut out the oval and make four cuts, shown in the picture as red lines, where the corners would be if it were a rectangle. This will help us shape the shell.

Cut out the oval, and make cuts along the red lines.

Cut out the oval, and make cuts along the red lines.

Overlap the cut edges to pop the center of the oval up a bit and tape them together, as in the photo below. Place your oval on a doubled layer of green fleece and cut about two inches outside the oval. (The photo shows more than two inches, but the extra wasn’t necessary.)

green

Cut a piece of iron-on batting just slightly larger than the cardboard. Adhere this to the wrong side of the fleece that will be the top of the shell.

Now let’s work on the spikes. If you’re making a turtle shell, you can skip this step, unless it’s a particularly bad-ass turtle. Cut ten half-circles out of felt. The necessary size will vary based on the size of your shell, so try making them out of paper and setting them on your shell until it looks right. Remember that your felt spike will be a bit smaller after sewing and turning it, so make it just a little larger than necessary. Bowser has four spikes down the center and three spikes on each side of his shell. Fold each half-circle in half, corners together, and sew along the straight edge. Clip the point and turn the spike inside out.

My half-circles were about 4.5" in diameter.

My half-circles were about 4.5″ in diameter.

spike2

Lay the green fleece with the batting on top of your cardboard oval, right side up. Place your spikes in their desired positions, if you’re using them. With white chalk, draw hexagons on the fleece – around the spikes or however you like. Remove the spikes and machine sew along these lines and through the batting.

hex quilt

When I did the next part, I sandwiched the two layers of green fleece, right sides together, and sewed around the edges. Then I turned it inside out. What I would do differently is stuff the spikes, pin them in place (bottom edges turned under slightly, seams facing the bottom of the shell), and hand sew them on. Then I would have basted the two layers together, WRONG sides together, with the cardboard and stuffing in place. There is really no reason to turn the shell inside out since the raw edge will be encased anyway, and it would have been a lot easier to sew the spikes on with access to the back, not to mention sewing through half as many layers for the edge. If you choose to do it the hard way for some reason, be sure to leave a gap large enough to insert the cardboard oval and stuffing. Don’t be surprised if your shell looks like a giant misshapen blob at this point – the binding should clean and tighten it up a bit!

pinspikes stuff

For the binding, we’re basically going to make some giant single fold bias tape (though I didn’t cut mine on the bias). Measure the circumference of the shell and add four or five inches. This is the length of felt you should cut. The width will just depend on how fat you want your binding. My tape was about four inches wide, plus an additional 1/2″ on each side. Fold and press the edges toward the center.
binding
If you need a little help sewing bias tape on a curve, here’s a nice video that explains it. It’s worth a watch before trying this, as this is the method I used. First, unfold one edge of the tape and pin it to the top of the shell, right sides together, all along the edge of the shell. Start at the bottom of the shell. When you reach your starting point, trim the excess tape and make sure to fold the end of the tape under a bit, positioning the folded edge under the raw edge so you end up with a nice seam. Sew the length of the tape, staying right on the fold line.

pinedge sewedge

Fold the tape over to the other side and stuff it with polyfill, pinning in place. Stitch it closed along the seam. You may need to do this by hand – I did, but of course I had more layers to sew through after turning the shell and my machine couldn’t hack it!

Stuff the edge pretty firmly

Stuff the edge pretty firmly

You can see the folded seam where the ends of the binding meet.

You can see the folded seam where the ends of the binding meet.

We’re in the home stretch now! Remember those upper arm straps we made back in part one? All we need to do is sew them in place! (And hey…if you made a pillow, you’re already done!) Grab your child (or dog, or whoever you’re making the shell for – I have to admit I’m pretty tempted to make a Koopa Paratroopa costume for my Corgi now) and pin the straps into place (think backpack). Hand sew them, and that’s it! Of course, I know there are red rings around Bowser’s spikes, but that’s just not a priority for me right now. I imagine it wouldn’t be too hard to add some red cord around the spikes if you just have to have it! I’ll see you in a few days for part three (Bowser’s head) – assuming I finish it!

straps


Can a 3-Year-Old Be King of the Koopas?

Filed under: DIY,Kids — VisibleBlue @ 12:02 am
Tags: , , , , , , , , ,

**2019 Update** The Simplicity 2506 pattern I used for this costume is no longer done2available. I haven’t tried it, but Simplicity 1765 looks like a good replacement option. Please let me know if you try it out!

**2017 Update** Every year I get a few requests to sell this costume or make new ones, and I regret that I am unable to do so. I wish you all the best of luck in finding another costume or making one for yourself!

Halloween is a busy time here at VisibleBlue. I get more traffic during October than any other month, no doubt thanks to the Cookie Monster costume series. But hey, that’s not really a surprise, considering I’m a terrible slacker during the rest of the year and I’ve updated….oh….only 4 or 5 times since then. Pathetic! Now I’m just going to go ahead and drum up some more Halloween traffic with this latest series – homemade Bowser costume!

This year, after some particularly inspired costume ideas (“tree,” “floor,” “mystery”) my son landed on Bowser – you know, the villain from the Super Mario Brothers franchise. Why pick a villain? Straight from his mouth: “I like monsters, and Bowser has spikes and I don’t have spikes.” Let’s remedy that, shall we?

I thought this would be a fairly simple purchase. I see tons of Marios and Luigis every Halloween, so surely one of the most recognizable video game villains of all time would have his own costume! As it turns out, he does not. The only one I could find was a full-size adult mascot-style costume. Hey, at least I have some practice at this costume-making thing!

I decided to break the costume down into parts, and I’ll do the same with these posts. The first post will focus on Bowser’s body, the second part of the series will be his shell, and in the third, we’ll construct his head. I’ll try to get the other two posts out before the week is over, but I’m actually still working on the head as we speak.

So let’s take a look at the main body parts. Hey, look! He’s basically just a dinosaur. Now where have I seen this costume before…Oh yeah! My new favorite purchase, the Simplicity 2506 pattern! Last year I modified the devil pattern to make Cookie Monster, and this year I tweaked the dinosaur pattern a bit and came up with a pretty passable Bowser! I used gold and cream fleece for his skin, and felt for everything else. I followed the pattern mostly as directed (minus the head), with a few exceptions.

The Materials

For the whole project – not all of these will be used in part one. This list assumes you’re making the costume for a small child – for a larger kid or adult, you’ll need to increase the yardage accordingly!

  • Gold fleece, as per the pattern
  • Cream fleece, as per the pattern (contrast)
  • Green fleece (about half a yard)
  • Black felt (one sheet)
  • Red felt (two sheets)
  • White felt (one sheet)
  • Cream felt (about half a yard) ( I used white, but wish I had bought cream instead.)
  • Batting (1/2 yard)
  • Polyfill (10 oz.)
  • Thread (green, black, cream, red, gold)
  • Notions as per the pattern
  • Studs or spikes (I salvaged mine from an old belt-turned-bag, but I have seen them at Jo-Ann Fabric)
  • Black ribbon, nylon webbing, or another material suitable for straps

The Feet

Stitching toenails

Three toenails per foot!

Like last year, I omitted the bottom of the booties so he can wear them like spats over his shoes. A strip of elastic holds them to his feet. I cut six teardrops out of white felt and sewed them to the front of the booties for toenails.

The Stomach

I added a few extra lines of quilting to the stomach, though in hindsight, I only needed to add one. I got a bit overzealous, I guess!

The Tail

Unfortunately, I didn’t take any photos of this process, but it wasn’t too difficult. Where the pattern directs you to cut the tail spike pieces, I chose to use white felt, and I only cut two pieces. I sewed and turned them like directed, but stuffed them firmly before sewing them into the tail. I prefer the 3-D spikes over the flat ones.

The Jewelry

4 upper arm pieces (to be joined into 2 strips), 2 wrist pieces, 2 neck pieces (to be joined into 1)

4 upper arm pieces (to be joined into 2 strips), 2 wrist pieces, 2 neck pieces (to be joined into 1)

Bear with me a bit, because here’s where the science goes out the window and the art comes into play. To make Bowser’s bracelets, necklace, and arm bands (which actually are not used in this section, but will come back in the shell tutorial), I cut strips of black felt approximately one inch wide. If you prefer, you could use something a bit stronger than felt for the upper arm straps, as they will be supporting the shell. If I had to do it over again, I might use ribbon or nylon webbing.) For the bracelets, I measured the distance around the wrist and was able to cut the felt an inch or so longer than that measurement. For the upper arm straps and neck, I had to sew two strips together to get the appropriate length. Here’s a photo of the strips after cutting – wrist pieces are labeled in chalk with “W”, upper arm pieces with “U”, and neck with “N”. I just guessed on the length of the upper arm pieces – you want to end up with something around the same length as backpack straps. For the spikes, I salvaged an old bag from another lifetime. They may not be as pokey as Bowser’s, but you get the idea. Plus, my son has to wear this to preschool.

It is.

This may or may not be me.

Did I think, 12 years later, I'd be using these on a Halloween costume? Not in a million years.

Did I think, 13 years later, I’d be using these on a Halloween costume for a kid? Not in a million years.

After putting all the studs into the felt (they have little prongs on the back), I hand sewed the bracelets onto the costume wristbands, and the necklace onto the neckband, leaving about half an inch of overlap. I added a piece of hook and loop tape to each side of the necklace.

Bring on the shell!

It'd be cuter with a kid in it.

It’d be cuter with a kid in it.


Super Easy Play Stove from Food Crate January 28, 2013

Filed under: DIY,Kids — VisibleBlue @ 9:55 pm
Tags: , , , , , , ,

Finished Stove

I live in a small house. It is so easy for my son’s toys to absolutely overrun the living room, and that is why he doesn’t have a play kitchen, even though playing with his play food is one of his favorite activities. Today, while he was unpacking his Melissa and Doug Cutting Food, I had an inspiration. He’s storing his food in this sturdy crate that comes with the food, why not turn it into a stove?

Thirty minutes later, we had a (still slightly sticky) easy-to-store stovetop, ready to make peanut butter-and-zucchini soup, or whatever it is he likes to cook. All it took was some construction paper and glue. There are no three-dimensional knobs, so it stores flat on the shelf, with all the food inside. Of course you could make this with a cardboard box or whatever you have lying around. On another day, I’ll make a little cardboard oven to set this stovetop on, with a door and rack, but this was enough crafting for today.

The whole process is pretty self-explanatory, but if you’d like more detail, read on!

Supplies:Supplies

  • Crate or cardboard box
  • Construction paper: 2 sheets of each – orange, black, white
  • Mod Podge or other glue
  • Paintbrush
  • Scissors
  • Compass (optional)
  • Paint pen (optional)

Cut your white paper to fit the surface of the crate. Don’t worry too much about overhang, you can trim it later (I really should have done that before taking pictures. That’ll teach me to try and crank out a tutorial quickly.) Spread a layer of glue on the surface and adhere the white paper. Try to smooth out any wrinkles (again, I did a horrible job of that.) Paint on another layer of glue.

White/black

Draw a spiral slightly smaller than the black circles you cut out.

Draw a spiral slightly smaller than the black circles you cut out.

Cut out four identical circles from the black paper – you can use a compass, or trace something round like a small bowl. My circles were about 4 3/4 inches in diameter. Glue these onto the white paper. Draw a circle of the same size onto the orange paper. Inside this circle, draw a spiral, freehand, keeping the negative space slightly larger than the desired width of the finished “coils.” Cut along your line. Don’t worry too much if it’s not so smooth – you’ll even it out in the next step. After your spiral is cut, trim a small amount (enough to let the black show through all around the coils) from both the inside and outside edges. Center your coil on one of the black circles, and glue it all down. Repeat for the other three coils.

This cap is around an inch in diameter.

This cap is around an inch in diameter.

For the knobs, I just found an object roughly the size I wanted (I used a lid from an almond milk container) and traced it onto the black paper. I cut all four out at a time and glued them to the bottom. Afterward, I gave everything another nice thick coat of Mod Podge. When it had all dried, I marked “hi” and “low” on the knobs with a white paint marker.

All glued!


Homemade Cookie Monster Costume, Part Deux October 23, 2012

I’m going to go ahead and post this without a proper finished project picture since we’re just a week away from Halloween right now, and some of you (slackers!) might still be looking for resources to help you craft a homemade Cookie Monster costume for a child. If you’re super short on time, just make the eyes and attach them to the hood of a blue sweatshirt, throw on some blue sweatpants, and you’re done!

You will need:

  • Pattern for jumpsuit-style costume with headpiece (I used Simplicity 2506 and modified it to suit my needs)

    Simplicity 2506

    Do you see Cookie Monster in here somewhere?

  • Blue or white shaggy faux fur in the amount the pattern calls for (for my 2T-wearing son, it was about 1 5/8 yard)
  • Notions, as per the pattern
  • Blue fabric dye for the fur, if it isn’t blue already (I used iDye Poly)
  • One set of googly eyes

I was able to find everything I needed (except the eyes) at my local Jo-Ann.

Major disclaimer before we begin – I did end up saving money by making the costume myself, but it was a huge investment of time and energy – don’t underestimate the value of your own time! It may not be worth it to save the extra $10-$20 when you need to put ten or more hours of work into the costume. (I’m a pretty amateur seamstress so your mileage will definitely vary on that estimate. You will need basic sewing skills and the ability to make sense of a pattern.) That said, I still enjoyed this project, and of course I’m happy to be able to say that I made it myself. My mom always made my Halloween costumes as a kid, and I’m glad that I can do the same for my son.

"After" picture of blue fur

Previously white fur after dying with blue iDye Poly

First things first – if your faux fur isn’t blue, you will need to dye it. Since it is probably polyester, nylon, or a blend, you won’t be able to use traditional (Rit) dye. I found some iDye Poly in the dye aisle of the store, picked up a blue pouch, and crossed my fingers. My faux fur was a long-pile, 60% polyester, 40% nylon white fabric, and the dye actually turned it the perfect shade of blue. You need to boil the fabric for up to an hour, however, and it is stinky, messy business. You will need a stainless steel pot big enough to boil the fabric – for me, that was a giant stock pot that we use to make beer. DO NOT let it boil over – you will end up with blue everything. I boiled the fabric for about 45 minutes. After rinsing it thoroughly  I washed it with a gentle cleanser and hung it to dry in my bathtub. If you need to clean up after – my stovetop and bathtub were a little blue, as well as the inside of the stock pot – Mr. Clean Magic Erasers seem to do a good job. My fabric ended up pretty warped at the selvedges unfortunately, but I was able to pull it into shape along the bias well enough to cut out the pattern.

After the fabric has completely dried, follow your pattern to make the jumpsuit portion. As I said above, I used the Simplicity 2506 pattern and modified it. I used the jumpsuit from style E without the tail, the headpiece from view A without the ears (which ended up being oddly small, and I will need to go back and fix,) and made the booties into spats, without the soles. I sewed a piece of elastic to the bottom to keep the toes of my son’s shoes covered. Make SURE to follow the nap of the fabric when you cut out the pattern pieces – otherwise, the fur won’t lie the same on all pieces, and it will look weird.

The final step is to attach the eyes. (If you missed the post on DIY googly eyes made from ping-pong balls, click here.) I used my Dremel to make two small holes in the bottom of each eyeball and sewed them to the headpiece with embroidery floss. They move around just the right amount when you walk! Now all you need to do is get your child to practice saying “OM NOM NOM!”

Finished Cookie Monster Costume

My husband suggested that this would make a great Cookie Monster-skin rug when Halloween is over.

It was 39 degrees and raining. Couldn’t get the head on while he was wearing the hood, but at least the dye stayed fast and he didn’t come home all blue!


DIY Googly (Cookie Monster) Eyes October 17, 2012

Filed under: DIY,Kids — VisibleBlue @ 4:41 pm
Tags: , , , , , , ,

As I’ve said before, my son is a little obsessed with Cookie Monster. Naturally, this was his choice for a Halloween costume. I could spend $45 and buy one, or I could try to make one myself! (Though I’m halfway through the project now, and thinking buying was the smarter option.) I’ll blog the rest of the project another day, but I wanted to hurry and get these eyes out there in case someone else needs to make them before Halloween.

*Part 2 of the project is available here now.*

These are super simple to make, and only a few items are needed:

  • Compass (the kind you use to draw circles)
  • Three white ping-pong balls (an extra or two if you want, in case of mistakes)
  • Craft knife
  • Black paint/paintbrush
  • Two tiny screws and appropriate screwdriver

Handy to have: sandpaper or a nail file and a vice to hold the ping pong ball as you are cutting, though I made do without.

Draw the circle

How did I keep my ping pong ball still? A jar opener and the container the balls came in!

Using the compass, draw a circle the size you want the pupil to be on one of the balls. The balls I used had graphics, but they were easy to avoid.

CAREFULLY cut around the circle with the craft knife. I shouldn’t need to say this, but

Cut out the circle.

For some reason the inside of the ping pong balls smelled awful, like mothballs!

obviously you’re using a very sharp instrument with a small and smooth object, so it’s really easy to slip. I suggest using something non-living to hold the ball firmly in place. After you remove the circle (this is now the pupil), you can sand the edges to make them smoother. I used a nail file.

Punch a hole OFF CENTER in the pupil. If your hole is dead center, the pupil won’t appear to move. The closer you get to the edge, the wilder the movement will be, but don’t put it so close that it’s structurally unsound. You’ll likely need to widen the hole so the pupil swings freely on the screw. You will also need to punch a hole in a fresh ping pong ball. I used the sharp end of my compass. If your balls have logos like mine did, make sure that the part you will attach to the costume (or whatever) will hide the logos, and place the pupil appropriately.

Attach the pupil

These tiny screws were left over from a computer build or something, but I imagine you could use the kind found in glasses.

Insert the screw into the hole you made in the pupil, and make sure it doesn’t stick when you shake it around. Then screw the pupil into the eyeball, stopping before you tighten it all the way (or the pupil won’t swing.) Shake it around again to make sure you’re happy with the movement. You may need to trim some from the pupil if it gets caught.

After the pupil moves like you want it to, unscrew it and paint it with black paint (I used acrylic Paint the pupilscraft paint.) Make sure not to paint the hole closed. You may need two coats. After it’s all dry, put the eyeball back together. You may want to paint the end of the screw to match the pupil.

That’s it! Attach the eyes however you want. I haven’t done it yet, but I plan on putting two holes in the bottom and sewing them on, or if I’m feeling particularly lazy, maybe I’ll just hot glue them.

Finished project

The more I look at this picture, the more creeped out I get.


What’s blue, googly-eyed, and in my downstairs fridge? April 5, 2012

Filed under: DIY,Food,Kids — VisibleBlue @ 9:55 pm
Tags: , , , , , ,
Cookie Monster Cupcakes

I giggle every time I open the refrigerator door.

My little boy is turning two tomorrow, and loves Cookie Monster. What better way to celebrate than with Cookie Monster cupcakes? I saw these on Pinterest and I just knew I had to make them for his birthday. Wanna do it yourself? Check out tips here, here, or here.

I chose to use frosting instead of coconut (husband: “Ew.”)  for the shaggy fur effect. I used a Wilton grass/hair tip (#233 I think?) and this totally delicious buttercream frosting recipe with a healthy dose of bright blue paste food coloring. I halved the recipe and it frosted a dozen normal size cupcakes with just a little left over. Clearly, I’m not a pro at piping, but I’m happy with the results anyway.

For the eyes, I used vanilla melts and chocolate chips. While I planned on attaching the pupils with a dab of icing, my husband came up with the great idea of just melting the two together, so I just pressed the flat side of the chocolate chip on a warm pan and stuck it to the melts. After sitting overnight in the fridge, they were firmly adhered.

Now all I need is a good blue-frosting-stain-remover for the party aftermath!


Turn your child’s art into wearable jewelry February 29, 2012

Filed under: DIY,Jewelry,Kids — VisibleBlue @ 1:40 pm
Tags: , , , , , , , , , , , , ,
Before and After

Hey, at least it's not made of macaroni.

I don’t know about you, but I always feel bad getting rid of my son’s art. Sure, I could just scan it all and save it digitally (no paper clutter!), but why not turn it into something I can wear and look at all the time? He’s not even two yet, so his art projects are still very…abstract. In other words, perfect for turning into jewelry.

Cut triangles

An assortment of cut triangles

His latest masterpiece was a fingerpainting we made on the paper that forms a tube inside cheap wrapping paper rolls. It’s really thick, so it didn’t bleed through, and I just love finding another use for something we would otherwise just recycle. After it was thoroughly dried, I cut it into little triangles with a craft knife. The triangles were about 3 inches long, but you don’t need to be too perfect when you cut them. I just eyeballed them all – some have thicker bases, some are longer or shorter, some are a little slanted. The width of the base will determine the width of your bead, so just cut them about as wide as you’d like your beads to be. I think it actually looks better when they’re all different, but feel free to cut them all the same for a uniform look.

Roll the bead

Step three - go get a manicure before posting pictures of your hands on the internet

The next step is to roll up the paper triangles, starting at the widest point, around a skewer or other thin object. Roll it very tightly, and use a dot of glue (I used superglue because it dries so quickly) to affix the point. Paint on some Mod Podge gloss for a nice, shiny finish. Let them dry on a hard surface. Voila! At this point, you can string your beads however you like and make a pretty nice bracelet or necklace. In the above example, I linked mine together with some simple silver wire and a few spacer beads. I wrapped about a third of the paper beads in 26 gauge silver wire.

Finished Beads

So shiny and candy-like....mmmm...

This would make a great mother’s day (or grandmother’s day) gift idea. Don’t have any art to work with? This method works with all kinds of paper – used calendars, wrapping paper, and torn pages from books or magazines, just to name a few. You could even upcycle extra wedding programs or invites for a special piece of jewelry!


Fav Baby/Kid DIY Sewing Tutorials October 18, 2011

Filed under: DIY,Kids — VisibleBlue @ 11:09 pm
Tags: , , , , , , , , , , , ,

Tonight, I’m working on a Halloween costume for my son – he’s going to be an Ewok. Last year, through some errors but great customer service from buycostumes.com, we ended up with two meerkat costumes – one of which is just the right size for him to wear this year. With a little bit of  upcycling, I’m using my old homemade Moby wrap for the other half of the costume. If it turns out, I’ll make another post on that. (Here’s hoping! I don’t want to buy a new costume this year!)

Anyway, this got me thinking about some of my favorite projects I’ve taken on in the last two years, and a few I haven’t tried yet. In no specific order:

Upcycled Boy's Hat

It looks adorable, when he keeps it on!

Upcycled hats– These adorable hats are made with old t-shirts. I even ended up making one for my husband, and lined it in fleece (though I haven’t seen him wear it yet!) Here’s my son in one.

Upcycled wool soakers (waterproof covers to go over cloth diapers)- I made several kinds, and they all work great. Just be sure to use totally natural wool – the cashmere soakers and longies  I made are super soft, and the merino wool and lambswool soakers are very absorbent. This is a great use for sweaters that were accidentally tossed in the dryer. You can also find cheap ones at thrift stores – some small holes are okay, if you can cut around them. Be sure to lanolize them before you use them! Here are two different tutorials: longies, and shorties.

A big list of boy’s clothes – I haven’t gotten around to making any of these yet, but several of these are on my to-do list!

Loads of (mostly free) felt food patterns and tutorials – I’m going to start making these once I think The Boy won’t try to eat them…


Starting at the (rear) end September 28, 2011

Filed under: Kids — VisibleBlue @ 12:26 am
Tags:

Ahhhhh, the first post in a shiny, brand-new blog. So full of promise, good intentions, and…blank space. I’m going to jump right in and remedy that with a nice, meaty post about something I get asked about a lot: cloth diapers.

Diapers on the clothesline

A rainbow of wetness protection!

Yes, I cloth diaper my 18-month-old son, and have been doing so since he was a wee, squirming, 8 pound infant. And no, I’m not a crunchy, tree-hugging hippie (though I count a couple among my circle of friends.) I’m just a normal mom who wants to save money, avoid contributing to landfills, and keep excessive nasty chemicals off my baby’s skin. It doesn’t hurt that today’s cloth diapers are just absolutely adorable in comparison to ‘sposies!

To dispel some common myths:

  • They’re hard to use. Diaper pins are a thing of the past, and today’s cloth diapers go on pretty much the same way as a disposable, with hook & eye closures or snaps. Prefolds (the flat, cotton cloths your mom probably made you use to dust the furniture) are still around, but are not as popular after the baby fits into one-size diapers (at around 10-11 pounds.) When they are used, there’s no need for pins – stretchy hooks called Snappis close the diaper without the danger of stabbing your precious little one!
  • You’ll be doing laundry ALL THE TIME! Realistically, with one child in diapers, you’ll only be doing one load of diaper laundry every 3 days or so. And since we’re not living in the 1850’s, your washing machine does most of the work for you. Cloth diapers (in my experience, and that of others I’m told) leak less than disposables, so at least you’ll be washing fewer tiny pants and onesies!
  • You won’t stick with it. Quite the contrary. Once you find the diapers that work best for your baby, the thought of switching to disposables is very off-putting. For some, it becomes something of an obsession – finding more and more cute diapers (prints! colors! new styles to try!) can be habit-forming! Plus, being forced to buy a Costco membership to afford diapers – and then running out at 3 in the morning to buy more – is a great deterrent.
  • You have to change cloth diapers more often. Ok, this one is actually true. But wait! Here’s why it’s not all bad – your baby will likely potty train much earlier than a child in disposables. The chemical gels in disposables wick wetness away from the baby’s skin – nice for their skin, but not so good for learning when they need to use the potty.

Of course, there are drawbacks to using cloth diapers too – but I’ll save that for another post. In the meantime, here is a great primer on using cloth diapers. It’s  a bit overwhelming at first, but sort through the info if you’re interested. I’m always open to questions – I’d like to think that the vast, encyclopedic knowledge I’ve acquired on the subject is actually of some use!