VisibleBlue

Bowser Costume, Part 3 – The Head October 25, 2013

Filed under: DIY,Kids — VisibleBlue @ 12:13 am
Tags: , , , , , , , , ,

Alright, we’re in the home stretch now! If you missed part one (the body) or part two (the shell) of the Bowser costume series, head that way and we’ll meet back here! If not, welcome to the most nebulous, frustrating, and free-form part of the costume – Bowser’s head! If I were to do the whole costume over again, I definitely would have started with this part, when I had some momentum! Now, a week away from Halloween, I just want to get the damn thing done. And sadly, it shows. Oh well, here we go!

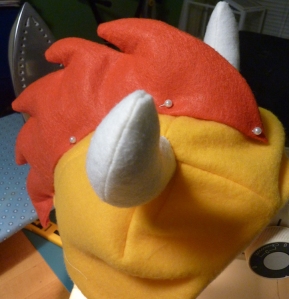
Remember our Simplicity 2506 pattern? We’re going to use that again for the head. Use the pattern for the dragon head – but don’t include the spikes. It’s basically just a regular hood.  Make sure you use the green fleece for his head – it’s not gold like the rest of his body. (Yep, I ended up making two hoods for that reason.) Also, cut out and sew the horns (using the cream felt) from the devil costume. Stuff, pin, and sew them onto the hood. You should set them slightly wider apart than I did.

Draw the hair shape, but be sure to leave room for the seam allowance!

Draw the hair shape, but be sure to leave room for the seam allowance!

For Bowser’s hair, draw a shape on the red felt that roughly follows the curve of the hood, with spikes on top. Make sure to account for seam allowance on the spikes when you draw them. Stack two layers of the felt and cut out your shape. Clip and fold up the bottom 1/4″ for a nicer finish (see fig. 1). Sew along the the top of the hair, turn, and press.  Stuff the hair with polyfill and pin to your hood. Faster option – instead of the spikes included in the pattern, cut out the shape of Bowser’s hair and sew it in the center of the hood, just like the pattern does with the spikes. All that hand sewing takes quite a lot of time.

Fig. 1 - Sew along the unfolded edges.

Fig. 1 – Sew along the unfolded edges.

Yes, astute reader, the hood should have been green! That is why it looks like an evil rooster.

Yes, astute reader, the hood should have been green! That is why it looks like an evil rooster.

While you have the red felt out, cut out two eyebrow shapes, like this:

eyebrows

Also cut out the parts of the eyes (two of each, obviously.) You’ll need red circles for the irises, smaller black circles for the pupils, and tiny white circles for the “shine”. Cut four sort-of-ovular shapes out of the white felt for the eyeballs. Sew two of them together, leaving space to stuff, and trim the edges. Firmly stuff the eyes and close the gap. I glued the parts of the eyes together, and ran a needle and thread through the iris where the “shine” would be just to ensure that they would stay put. Sew the eyes into place, and glue the eyebrows on top of them. Faster option – 2-D  eyes would be perfectly lovely, too!

The scale will be totally dependent on the size of your hood, but in my version, the irises are a little larger than a nickel.

The scale will be totally dependent on the size of your hood, but in my version, the irises are a little larger than a nickel. Just eyeball it. Ha! Get it?

The longer I look at this, the creepier it gets.

The longer I look at this, the creepier it gets.

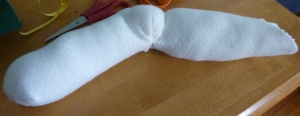
Now, the mouth. Ahhh, the mouth, my biggest challenge, and biggest disappointment. I’m sure I’ll spend the next week tweaking it to try and get it to look right, but for now, here’s what I have. I really had no idea where to start. My initial idea of molding felt around ping pong balls didn’t really pan out, so I had a glass of wine or two, didn’t come up with any brilliant ideas, and decided just to make a tube out of the cream felt.  I wanted to at least have some definition in the nose, so I sort of folded the edges in and sewed them in place. This created kind of a “point” at the bottom, which I folded back and sewed down. I wish I could explain that better, but I’m really not sure how.

This is the point at which I knew this would not end well.

Underside of the mouth. It looks strikingly like a sock. This is the point at which I knew this would not end well.

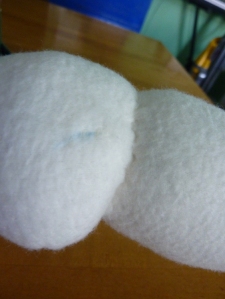
Closer version of the mouth - the blue is where nostrils would go.

Closer version of the mouth – the blue is where nostrils would go.

teethI stuffed the center firmly and the ends more loosely. I cut out three sets of triangles for teeth from the white felt, and sewed them onto the bottom of the mouth, pressing them down at the seam. Then I closed up the edges and sewed the whole thing to the hood.

So here are the problems I’m left with: The mouth is too low and makes it difficult for my son to see out. I’m going to add some elastic to the back of the hood in hopes that it will pull the front up a bit. Also, the mouth is too wide. I want it to fold down in the middle and up at the edges a bit. Tying the ribbons under his chin helps a bit, but it’s not what I had envisioned. Anyone have any ideas? I have a week left – I’d love to hear them!

Doing his best Bowser impression.

Doing his best Bowser impression.


Homemade Cookie Monster Costume, Part Deux October 23, 2012

I’m going to go ahead and post this without a proper finished project picture since we’re just a week away from Halloween right now, and some of you (slackers!) might still be looking for resources to help you craft a homemade Cookie Monster costume for a child. If you’re super short on time, just make the eyes and attach them to the hood of a blue sweatshirt, throw on some blue sweatpants, and you’re done!

You will need:

  • Pattern for jumpsuit-style costume with headpiece (I used Simplicity 2506 and modified it to suit my needs)

    Simplicity 2506

    Do you see Cookie Monster in here somewhere?

  • Blue or white shaggy faux fur in the amount the pattern calls for (for my 2T-wearing son, it was about 1 5/8 yard)
  • Notions, as per the pattern
  • Blue fabric dye for the fur, if it isn’t blue already (I used iDye Poly)
  • One set of googly eyes

I was able to find everything I needed (except the eyes) at my local Jo-Ann.

Major disclaimer before we begin – I did end up saving money by making the costume myself, but it was a huge investment of time and energy – don’t underestimate the value of your own time! It may not be worth it to save the extra $10-$20 when you need to put ten or more hours of work into the costume. (I’m a pretty amateur seamstress so your mileage will definitely vary on that estimate. You will need basic sewing skills and the ability to make sense of a pattern.) That said, I still enjoyed this project, and of course I’m happy to be able to say that I made it myself. My mom always made my Halloween costumes as a kid, and I’m glad that I can do the same for my son.

"After" picture of blue fur

Previously white fur after dying with blue iDye Poly

First things first – if your faux fur isn’t blue, you will need to dye it. Since it is probably polyester, nylon, or a blend, you won’t be able to use traditional (Rit) dye. I found some iDye Poly in the dye aisle of the store, picked up a blue pouch, and crossed my fingers. My faux fur was a long-pile, 60% polyester, 40% nylon white fabric, and the dye actually turned it the perfect shade of blue. You need to boil the fabric for up to an hour, however, and it is stinky, messy business. You will need a stainless steel pot big enough to boil the fabric – for me, that was a giant stock pot that we use to make beer. DO NOT let it boil over – you will end up with blue everything. I boiled the fabric for about 45 minutes. After rinsing it thoroughly  I washed it with a gentle cleanser and hung it to dry in my bathtub. If you need to clean up after – my stovetop and bathtub were a little blue, as well as the inside of the stock pot – Mr. Clean Magic Erasers seem to do a good job. My fabric ended up pretty warped at the selvedges unfortunately, but I was able to pull it into shape along the bias well enough to cut out the pattern.

After the fabric has completely dried, follow your pattern to make the jumpsuit portion. As I said above, I used the Simplicity 2506 pattern and modified it. I used the jumpsuit from style E without the tail, the headpiece from view A without the ears (which ended up being oddly small, and I will need to go back and fix,) and made the booties into spats, without the soles. I sewed a piece of elastic to the bottom to keep the toes of my son’s shoes covered. Make SURE to follow the nap of the fabric when you cut out the pattern pieces – otherwise, the fur won’t lie the same on all pieces, and it will look weird.

The final step is to attach the eyes. (If you missed the post on DIY googly eyes made from ping-pong balls, click here.) I used my Dremel to make two small holes in the bottom of each eyeball and sewed them to the headpiece with embroidery floss. They move around just the right amount when you walk! Now all you need to do is get your child to practice saying “OM NOM NOM!”

Finished Cookie Monster Costume

My husband suggested that this would make a great Cookie Monster-skin rug when Halloween is over.

It was 39 degrees and raining. Couldn’t get the head on while he was wearing the hood, but at least the dye stayed fast and he didn’t come home all blue!


DIY Googly (Cookie Monster) Eyes October 17, 2012

Filed under: DIY,Kids — VisibleBlue @ 4:41 pm
Tags: , , , , , , ,

As I’ve said before, my son is a little obsessed with Cookie Monster. Naturally, this was his choice for a Halloween costume. I could spend $45 and buy one, or I could try to make one myself! (Though I’m halfway through the project now, and thinking buying was the smarter option.) I’ll blog the rest of the project another day, but I wanted to hurry and get these eyes out there in case someone else needs to make them before Halloween.

*Part 2 of the project is available here now.*

These are super simple to make, and only a few items are needed:

  • Compass (the kind you use to draw circles)
  • Three white ping-pong balls (an extra or two if you want, in case of mistakes)
  • Craft knife
  • Black paint/paintbrush
  • Two tiny screws and appropriate screwdriver

Handy to have: sandpaper or a nail file and a vice to hold the ping pong ball as you are cutting, though I made do without.

Draw the circle

How did I keep my ping pong ball still? A jar opener and the container the balls came in!

Using the compass, draw a circle the size you want the pupil to be on one of the balls. The balls I used had graphics, but they were easy to avoid.

CAREFULLY cut around the circle with the craft knife. I shouldn’t need to say this, but

Cut out the circle.

For some reason the inside of the ping pong balls smelled awful, like mothballs!

obviously you’re using a very sharp instrument with a small and smooth object, so it’s really easy to slip. I suggest using something non-living to hold the ball firmly in place. After you remove the circle (this is now the pupil), you can sand the edges to make them smoother. I used a nail file.

Punch a hole OFF CENTER in the pupil. If your hole is dead center, the pupil won’t appear to move. The closer you get to the edge, the wilder the movement will be, but don’t put it so close that it’s structurally unsound. You’ll likely need to widen the hole so the pupil swings freely on the screw. You will also need to punch a hole in a fresh ping pong ball. I used the sharp end of my compass. If your balls have logos like mine did, make sure that the part you will attach to the costume (or whatever) will hide the logos, and place the pupil appropriately.

Attach the pupil

These tiny screws were left over from a computer build or something, but I imagine you could use the kind found in glasses.

Insert the screw into the hole you made in the pupil, and make sure it doesn’t stick when you shake it around. Then screw the pupil into the eyeball, stopping before you tighten it all the way (or the pupil won’t swing.) Shake it around again to make sure you’re happy with the movement. You may need to trim some from the pupil if it gets caught.

After the pupil moves like you want it to, unscrew it and paint it with black paint (I used acrylic Paint the pupilscraft paint.) Make sure not to paint the hole closed. You may need two coats. After it’s all dry, put the eyeball back together. You may want to paint the end of the screw to match the pupil.

That’s it! Attach the eyes however you want. I haven’t done it yet, but I plan on putting two holes in the bottom and sewing them on, or if I’m feeling particularly lazy, maybe I’ll just hot glue them.

Finished project

The more I look at this picture, the more creeped out I get.